
By Gaye Levy
Contributing Writer for Wake Up World
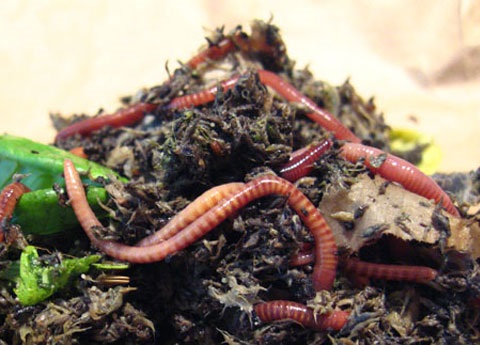
A couple of weeks ago I wrote about using worms to create compost. The official term for this is “Vermicomposting” and the great thing about it is that it is clean and tidy and does not take up a lot of space. For folks that have small yards or live in apartments, this is ideal. Plus, if need be, vermicomposting can even be done indoors. Imagine composting in on your porch, a deck or even in your laundry room!
Now that I have you excited about composting with worms – and specifically red worms – I would like to provide you with instructions for building the cheapest worm bin imaginable. It is built out of commonly available supplies and is so easy, even a novice handyman (handyperson?) can do it.
The Cheap and Easy Worm Bin
Materials:
Here are the materials you will need to build your worm bin.
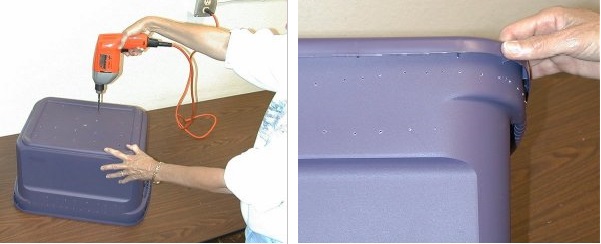
* Two 8 to 10 gallon plastic storage bins
* Drill (with 1/4”³ and 1/16”³ bits) for making drainage and ventilation holes
* Newspaper
* About one pound of red wiggler worms
The bins should be opaque and not clear. This is because worms like to live in the dark and will not thrive if there is any light coming into their home.
Also, although you could use larger bins, they will be too doggone heavy to lift once they are full of nicely composted worm castings. Stick with the smaller 8 to 10 gallon size. These will set you back about $5 each.
Putting it all together:
1. Drill about twenty evenly spaced 1/4 inch holes in the bottom of each bin. These holes will provide drainage and allow the worms to crawl into the second bin when you are ready to harvest the castings.
2. Drill ventilation holes about 1 – 1 ½ inches apart on each side of the bin near the top edge using the 1/16 inch bit. Also drill about 30 small holes in the top of one of the lids.
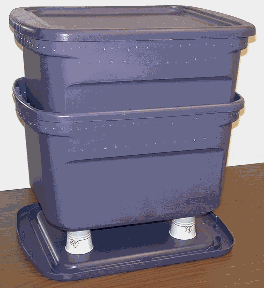
Note: You are going to need to build two bins although in the beginning, only one will be used.
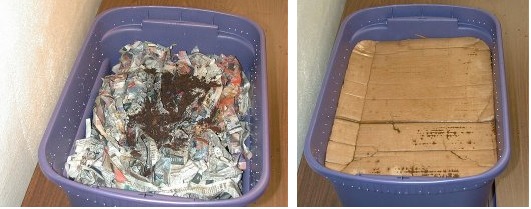
3. Prepare some nice bedding for the worms by shredding some newspaper into 1 inch strips. Worms need bedding that is moist but not soggy.
Moisten the newspaper by soaking it in water and then squeezing out the excess water. Easier still, fill a spray bottle with water and spritz the shredded newspaper until it is nice and damp. This might take a while because you will want to fluff it up as you go but it will prevent the worm bedding from getting too soggy.
4. Cover the bottom of the bin with 3 to 4 inches of the moist newspaper. Continue to fluff it up so that it is nice and airy. If you have any old leaves or leaf litter, that can be added also. Throw in a handful of dirt for “grit” to help the worms digest their food.
5. Add your worms to the bedding.
6. Cut a piece of cardboard to fit over the bedding, and get it wet. Then cover the bedding with the cardboard. Worms love cardboard and it will break down within months.
7. Place your bin in a well-ventilated area such as a laundry room, garage, balcony, under the kitchen sink, or outside in the shade. Place the bin on top of blocks or bricks or upside down plastic containers to allow for drainage. You can use the lid of the second bin as a tray to catch any moisture that may drain from the bin. This “worm tea” is a great liquid fertilizer that can be used right away on your indoor or outdoor plants.
8. Feed your worms slowly at first. As the worms multiply, you can begin to add more food. Gently bury the food in a different section of the bin each week, under the cardboard. The worms will follow the food scraps around the bin. Burying the food scraps will help to keep fruit flies away.
The Skinny on Worm Food
What do worms like to eat? Worms are vegetarians. They like green stuff mostly and absolutely no meat and no dairy. That means no bones, no grease and no anything with grease.
On the other hand, almost anything else that would normally go down the garbage disposal can go into your worm bin. Just don’t be surprised if you notice that some foods will be eaten faster than others. Worms have their preferences just like we do.
| Worms LOVE This Stuff |
Worms HATE This Stuff | Worms LIKE brown stuff too! |
| Breads & Grains | Dairy Products | Newspaper |
| Cereal | Fats | Office paper |
| Coffee grounds & filters | Meats | Leaves |
| Fruits & vegetables | Oils | Cardboard |
| Tea bags | Paper towels | |
| Fruit & veggie peels | TP rolls | |
| Rice & Pasta |
When the Worm Bin is Full
When the first bin is full and there are no recognizable food scraps left, it is time to split the bin so you can begin the harvest.
 Place new bedding material in the second bin and place the bin directly on the compost surface of the first bin. Bury your food scraps to the bedding of the second bin. In one to two months, most of the worms will have moved to the second bin in search of food. (Remember those little drill holes we made at the onset?)
Now the first bin will contain (almost) worm free vermicompost. There may be a few straggler worms left in the first bin. These can be gently lifted out of the bin and placed in the new bin or you can simply add them to your garden along with the new compost.
If you don’t care about creating a second harvest down the road, you can skip the step where you split the bin. The worm population will adapt to the amount of space and food available and things will remain stable until you decide to remove the compost and begin the process all over again.
Troubleshooting
| Problem | Probable Cause | Solution |
| Worms are dying or trying to escape | Too wet | Add more bedding |
| Too dry | Moisten bedding | |
| Bedding is used up | Harvest your bin | |
| Bin stinks! | Not enough air | Drill more ventilation holes |
| Too much food | Do not feed for 1-2 weeks | |
| Too wet | Add more bedding | |
| Fruit Flies | Exposed food | Bury food in bedding |
A Note About the Worms
Here in the Pacific Northwest, you can gather your own red worms. All you need to do is to put out a large piece of wet cardboard on your lawn or garden at night. The red worms live in the top 3 inches of organic material and like to come up and feast on the wet cardboard. In the morning, lift up cardboard to gather your red worms.
Elsewhere, or if you don’t have a lawn or suitable garden, you can purchase worms. Be sure to ask for “red wigglers”.
According to Chris Benedict, a Regional Extension Specialist at Washington State University, an earthworm can consume about 1/2 of its weight each day. He says, for example:
If your food waste averages 1/2 pound per day, you will need 1 pound of worms or a 2:1 ratio. There are roughly 500 worms in one pound. If you start out with less than one pound, don’t worry they multiply very quickly. Just adjust the amount that you feed them in accordance with the size of your worm population.
Check out Composting with Red Worms for lots more information about caring for your worms!
The Final Word
Imagine how easy it would be to create organic compost for your garden without having to trek to an obscure corner of your backyard in order to carry your food scraps to the compost bin. Instead, why not let red worms eat your food wastes? In a matter of months and not years, you will end up with one of the best soil amendments out there, namely worm castings.
My thanks to Chris Benedict who provided inspiration and gave me permission to use his ideas and his photos in this article. In addition, he has provided this link for building a more advanced, wooden worm bin: Build a Worm Compost Bin.
If your have not done so already, read Learn to Love Worms with Vermicomposting. And after that? My guess is that you will want to go out and get some materials so that you can build your own worm bin!
Enjoy your next adventure through common sense and thoughtful preparation!
Gaye
Further articles by Gaye Levy
- Spices for the Survival Pantry
- Water: the Most Important Survival Basic
- 21 Home Remedies for a Toothache Emergency
- 7 Last Minute Prepping Items
- The Miracle of Tea Tree Oil: 80 Amazing Uses for Survival
- 26 Five-Minute Prepping Projects
- 10 Simple Steps Toward Self-Sufficiency
- Creating a Healing Garden: 9 Healing Herbs You Can Grow Yourself
About Gaye Levy
Gaye Levy, also known as the Survival Woman, grew up and attended school in the Greater Seattle area. After spending many years as an executive in the software industry, she started a specialized accounting practice offering contract CFO work to emerging high tech and service industries. She has now abandoned city life and has moved to a serenely beautiful rural area on an island in NW Washington State. She lives and teaches the principles of a sustainable and self-reliant lifestyle through her website at BackdoorSurvival.com.
At Backdoor Survival, Gaye speaks her mind and delivers her message of prepping with optimism and grace, regardless of the uncertain times and mayhem swirling around us.
You can find Gaye through her website at Backdoor Survival, on the Backdoor Survival Page on Facebook, and as Survival Woman on Twitter.
If you have not done so already, please be sure to like Backdoor Survival on Facebook to be updated every time there is an awesome new article, news byte, or free survival, prepping or homesteading book on Amazon. In addition, when you sign up to receive email updates you will receive a free, downloadable copy of Gaye’s e-book The Emergency Food Buyer’s Guide.
If you've ever found value in our articles, we'd greatly appreciate your support by purchasing Mindful Meditation Techniques for Kids - A Practical Guide for Adults to Empower Kids with the Gift of Inner Peace and Resilience for Life.
In the spirit of mindfulness, we encourage you to choose the paperback version. Delve into its pages away from screen glare and notifications, allowing yourself to fully immerse in the transformative practices within. The physical book enriches the learning process and serves as a tangible commitment to mindfulness, easily shared among family and friends.
Over the past few years, Wake Up World has faced significant online censorship, impacting our financial ability to stay online. Instead of soliciting donations, we're exploring win-win solutions with our readers to remain financially viable. Moving into book publishing, we hope to secure ongoing funds to continue our mission. With over 8,500 articles published in the past 13 years, we are committed to keeping our content free and accessible to everyone, without resorting to a paywall.