
Contributing writer for Wake Up World
I remember how tasty shop-bought coconut and chocolate bars seemed to be, back in the days when I ate that ‘regular’ kind from the store. I’d enjoy them for a moment of indulgence; get a sugar kick; a brief feeling of euphoria; then I’d experience that uncomfortable ‘I know this wasn’t good for me’ sort of feeling (thankfully for me, that was over 20 years ago now). These days when I create a really delicious dessert I feel like I want to make a huge brimming plate full and celebrate with everyone I know – because creating and sharing a conscious dessert is so much more vibrational raising for us than any sugar, dairy additive laden varieties.
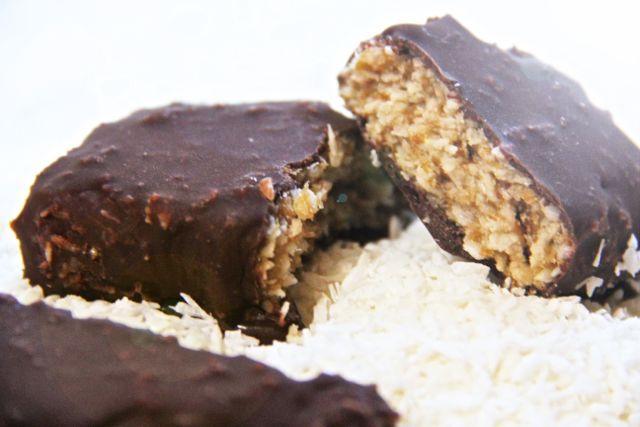
My new Chocolate Paradise Coconut Bars are from a whole different world to any conventional alternative. I use super health affirming ingredients and like all my recipes, they are free from dairy and refined sugar.
Chocolate Paradise Coconut Bars
Makes: 4 bars
Preparation time: ½ hour approx (plus soaking time)
Ingredients:
The coconut filling ingredients…
- 100g pitted dates or raisins
- 50g extra virgin coconut butter
- 75g dessicated coconut
- 1 teaspoon vanilla extract
Home made raw chocolate ingredients…
- 50g raw cocoa butter
- 50g raw cocoa powder
- 3 tablespoons raw coconut sugar
- 1 teaspoon vanilla extract
You will also need:
- A container – something like 12cm x 14cm (5in x 5in)
- A small piece of parchment paper
- A hand blender, jug blender or food processor
Instructions:
- Start by soaking the raisins for three hours ahead of time. You can get away with less time if you are in a hurry, although they’ll be easier to blend with a little more time. You can leave them over night if you prefer too. The point here is to make them soft and blendable by absorbing the soak water. Be sure to drain off the water thoroughly before blending.
- Place the coconut butter, raisins and vanilla essence together in a jug and blend together thoroughly. I find this easiest with a hand blender, where I can move the blade around to get in there more, whilst pressing downwards to help the blending process – but use whatever you have available.
- Once you’ve blended these ingredients, press in the dessicated coconut with a spoon and mix in thoroughly.
- Line your container with a layer of parchment paper and press your coconut filling in firmly. Ideally you’ll have a thickness of about 1.5cm (just over ½ an inch)… thicker is fine if your container is smaller.
- Place your coconut bars in the freezer for a good half hour to chill and set ready for coating with chocolate (freezing for longer is fine – although bear in mind that you’ll have to slice them with a sharp knife, so best not to let them freeze solid) .
Make your own raw chocolate to coat them with as follows…
Step One:
‘Shave’ the solid cocoa butter with a sharp knife or grater. Shaving is just really thin slicing that makes the cocoa butter crumble. The finer you can get it, the easier it will be to melt. You can leave it in big chunks if you like, but be prepared to wait a while for it to melt.
Step Two:
Melt the cocoa butter. You can do this by leaving it in a warm place in a heat proof glass bowl by a fire or directly above a hot radiator. It melts at 34ËšC. The idea is to melt it, rather than cook it, maintaining its ‘un-cookedness’. If you don’t have a gentle heat source then use a hob or stove. Put the cocoa butter in a small, oven proof, glass bowl and then put that bowl in a pan containing an inch or so of really hot water. Keep the hob/stove burning on a low heat. The heat will then transfer through the bowl, enough to melt the cocoa butter. Give it frequent stirs to assist the melting process. Don’t keep it on the heat any longer than it takes to melt it.
The best time to use it is when it has just melted. If it is too hot, then it takes longer to cool down and the coconut sugar will sink to the bottom of the chocolate when added.
Step Three:
Add the coconut sugar to the melting cocoa butter during step two. The melting cocoa butter will help to soften and dissolve the sugar.
Step Four:
When the cocoa butter has finally melted, mix in the cocoa powder and any other remaining ingredients.
Coating the coconut bars with chocolate…
- Take your coconut bars out of the freezer. Pull them out with the parchment paper underneath and place them onto a mini chopping board. Use a super sharp knife to divide into 4 slices (or make more smaller bite sized bars if you prefer).
- Take a bar and gently lower it into the melted chocolate that you created as above. Flip the bar over a couple of times until the whole bar is coated. Quickly pull it out and pop it back onto the parchment paper. If your bars are well chilled the melted chocolate will set quickly. Repeat with all the bars.
- Don’t be afraid of getting chocolate on your hands – that’s the real fun part! It might help to keep one hand chocolate free, if you just use one hand though.
- Pop your bars back into the freezer for a minute (this helps the chocolate coat harden quickly, ready for the next coating).
- Take your bars out of the freezer again and repeat the coating/freezing process two more times (to thicken outer coat) or until all of the chocolate has been used up.
- You can place the final coated batch in to the refrigerator until you are ready to serve and share (no need to freeze after the final coating, unless you want frozen coconut lolly bars, of course).
I do hope that you enjoy these tasty treats as much as we did!
Please do let me know how you get on and feel free to share, pass on this page to anyone who might enjoy them too.
From my coconut inspired heart to yours,
Trinity x
Recommended articles by Trinity Bourne:
- 10 Reasons Why We all Should be Eating Ginger – Recipes Included
- Recipe: Green Superfood Smoothie Jam Packed with Health Benefits
- Top Tips for Making Deliciously Healthy Salads
- The Importance of Eating Seeds for a Healthy Diet – Tips, Benefits & Recipes
- Foraging Guide – with 12 Nutritious Wild Plants That Anyone Can Find
- Keeping Slugs & Snails Off Your Veggies – Compassionately
- Chocolate Paradise Coconut Bar Recipe – Vegan, Raw, Absolutely Delicious!
- The Superfood Health Benefits of Celery (with Recipes!)
- Chocolate Covered Coconut Bliss Bars (Vegan, Gluten-Free, No-Bake)
About the author:

Trinity is an experienced, empathic energy worker and the author of ‘Trinity’s Conscious Kitchen’ and ‘Angelicious’, recipe books designed to inspire the soul through conscious vegan, wheat-free and gluten-free cuisine.
20+ years ago Trinity had a profound spiritual awakening that interconnected her with the deeper consciousness of life. What followed was a journey of compassion for all sentient beings, and a passion to share conscious eating for the benefit of all. Understanding that the energy of our food directly impacts sentient life on all levels, Trinity founded Trinity’s Conscious Kitchen, a website devoted to inspiring the soul through conscious, plant-based cuisine. She is also the co-founder of Openhand, an organisation dedicated to the conscious evolution of humankind.
For more, visit trinityskitchen.com and follow Trinity’s Kitchen on Pinterest and Facebook!

If you've ever found value in our articles, we'd greatly appreciate your support by purchasing Mindful Meditation Techniques for Kids - A Practical Guide for Adults to Empower Kids with the Gift of Inner Peace and Resilience for Life.
In the spirit of mindfulness, we encourage you to choose the paperback version. Delve into its pages away from screen glare and notifications, allowing yourself to fully immerse in the transformative practices within. The physical book enriches the learning process and serves as a tangible commitment to mindfulness, easily shared among family and friends.
Over the past few years, Wake Up World has faced significant online censorship, impacting our financial ability to stay online. Instead of soliciting donations, we're exploring win-win solutions with our readers to remain financially viable. Moving into book publishing, we hope to secure ongoing funds to continue our mission. With over 8,500 articles published in the past 13 years, we are committed to keeping our content free and accessible to everyone, without resorting to a paywall.